WeMacro Rail
by Johan J Ingles-Le Nobel
Last updated April 23, 2018

The WeMacro Rail is an electronically controlled z-axis stage, a device used for macro photography focus stacking. The WeMacro bundle includes an Android or iPad/iPhone client for field use, and a Windows client for indoor studio use. The WeMacro stage has 100mm stage travel distance with 1µ step sensitivity, and currently retails for US$249 excl. p&p, delivery worldwide.
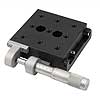
The WeMacro stage. A budget version of the Stackshot package lacking much of the software functionality, nevertheless the WeMacro stage is perfectly capable of stacking 1µm steps.
What's In The Box?
The WeMacro macro rail, now in its third beta iteration, was released for sale during q1 2016. The product comes in a shoebox-sized package, which contains:
- The WeMacro stage;
- A microprocessor enclosure (the 'control box');
- A remote shutter cable;
- 4 different "heads" to fit onto the shutter cable (for compatibility for Canon, Nikon & Pentax);
- A solid-lock 4-core cable to connect control box to stage;
- A USB 2.0 connector cable to connect the control box to PC;
- A power supply to connect the control box to the mains; and
- A screw-in camera bolt to connect camera to rail.
Specifications
Within the market for electronic stages used for macro focus stacking, the bar is set very high by the Cognisys Stackshot, currently the class-leading macro focus stacking rail. Comparisons between the WeMacro bundle and the Stackshot bundle are therefore inevitable.
Focus Stacking Walkthrough
1 ➤ The focus stacking workflow
2 ➤ How to prepare a focus stack
3 ➤ How to shoot a focus stack
4 ➤ Software tools for focus stacks
5 ➤ Postprocessing tools for focus stacking
Both the WeMacro and Stackshot stages have a 100mm travel distance, and both sit the camera base at a height within millimetres of each other. The Stackshot is a slightly wider device than the WeMacro (86mm vs 80mm), and both stages use the industry standard Swiss arca-type dovetail connections as a base. Both feature holes in the base so they can be attached to other platforms. The WeMacro device has a minimum step size of 1µ, and according to mfr specs, it can carry a load of 3kg using a 12V power supply, compared to Stackshot's 4.5kg. The motor driving the WeMacro unit is a 47mm deep NEMA 17 motor with 5mm shaft size, a marginally deeper motor than the Stackshot (47mm vs. Stackshot's 40mm), and the thread on the WeMacro screw shaft is finer (1mm thread pitch - 10 rotations make for 10mm travel, vs 15.9mm on Stackshot). The stepper has 200 steps per revolution(1.8 degrees per step), and each full motor step means 1000micron/200, = 5 micron movement; this contains 5/0.3125=16 micro steps. The motor is bipolar: 2 phase and 4 wires.
The WeMacro device has a minimum step size of 1 micron, and according to mfr specs can carry a load of 3kg using a 12V power supplyWeMacro runs in one of two modes: a fast "mm" mode or a briefer "micron" mode which presumably correspond to stepping and microstepping. The fast "mm" mode is fast and brash, travelling 50mm in 17 seconds. The "micron" mode is also fast but very brief, and (thankfully!) lacks that high-pitched screech characteristic of Stackshot's 'high precision' mode (although it does periodically screech a bit for one single step, every 10th-20th step or so). That said, in fact the shutter activations on the control box are louder than the noise the stage makes when microstepping. Being bigger with better heat dissipation, the WeMacro motor doesn't get especially hot, and even after 1500 steps of 1µ the temperature of the stepper motor was still only 35.9 degC, the temperature of a warmish coffee (ie not a hot, straight out the machine, coffee - not hot to the touch).
WeMacro In The Field
For field work, WeMacro includes a freely downloadable WeMacro Android client (android at least 4.3 with bluetooth 4.0) at http://www.wemacro.com/?p=564, which requires use of an on-the-go(OTG) adapter using an Android phone with fully working on-the-go functionality. I do not use Android so have not tested it, but the Android client appears to have much the same functionality as the WeMacro PC software, and do everything needed to run a field stack. You can set backlash compensation in this app, tvalue is around 180 micron for new rail. On top of the Android client, WeMacro also has an iPhone app in the app store (iOS device compatibility: ipad 3+, iphone 4S+).
According to the manufacturer, the WeMacro stage can be powered in the field by a 12V lithium battery or any lead acid battery which can provide about 2 amp current (specifically a DC cable with 5.5mm x 2.1mm plug, with positive pole inside). By pure coincidence, I discovered that the power supply that powers a Stackshot in the field will also drive a WeMacro in the field - both units take the same plug. Yes, I plugged it in. The specs of the Stackshot field power unit are 4 rechargeable Li-ion batteries, 14.8V, 2600mAh, 4A max, but for what it is, it's kind of pricey (at the time of writing US$119 at https://www.cognisys-inc.com/store/li-ion-battery-kit.html). This field power unit can surely easily be homemade using a bit of jack welding and a £1 18650 battery container unit, commonly found on eBay.
WeMacro In The Studio
WeMacro Installation Video
At the time of writing, WeMacro desktop/PC software is windows-only, compatible with WinXP, Win7, Win8 and Win10, and is a free download from the WeMacro website. There is no CD or manual in the box that WeMacro is supplied in, installation instructions are only available via the website and video online to the right.
Installation of the PC client is marginally more tricky than your usual click and install package, as it does require the user to identify which port has been used to connect using the Windows System Device Manager -- but if I can manage it, then I believe anyone can.
WeMacro For PC.
Studio Stacking With WeMacro
WeMacro For PC software is a one interface client, with five sections, some of which need to be completed in sequence before others.
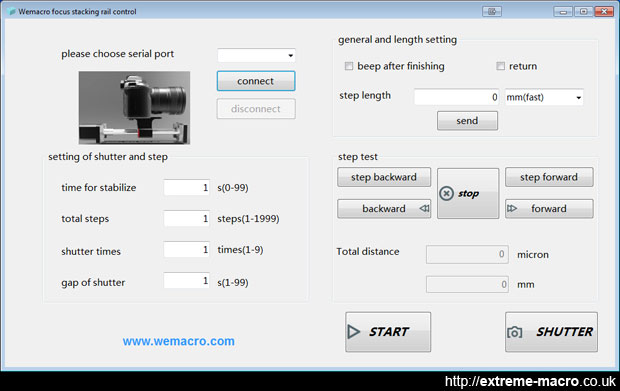
Step 1: Set Serial Port
After launching the 224Kb unzipped executable WeMacrocontrol.exe, the first thing that you have to do is to set is the serial port, on the top left of the interface. Serial port is geekspeak for USB port; this is something that depends on which USB port that you put the plug in whilst installing the application, in my case it is port 5. There are instructions in the WeMacro video overview at https://youtu.be/X3xLO9ZvWug about how to find out the right port number value to set: bottom line, you'll have to look in your PC's System Device Manager.

WeMacro error message... pretty cryptic stuff
Once you have chosen the serial port on the dropdownlist press connect, and if successful the connect button will go grey and disconnect go ungrey. If you are not successful connecting the serial port then the error message is somewhat cryptic: something along the lines of System.IO.IOException: The port 'COM5' does not exist... etc. To try again, just kill the error dialogue window, connect it up properly, set your com again and press the connect button.
Step 2: Set Shutter And Step
Next, there are a bunch of timings to be set: "setting of shutter and step" on the bottom left of the user interface. These are largely self-explanatory, and are the stack timings and number parameters driving the total duration of the stack. Specifically, what they mean:
- (1) "time for stabilize": settle time allowed after the stage has moved each step. This is to eliminate vibrations lingering on after the move, typically I use 5 seconds or so. (value 0-99)
- (2) "total steps": how many steps to perform in total in your stack, ie how many steps in the stack (value 1-1999)
- (3) "shutter times": how many times to activate the shutter during each step - ie shots per step (value 1-9)
- (4) "gap of shutter": how much time to allow for each of those shutter activations. This has to be longer than your exposure time as the exposure needs to fit 'inside' this time. So your exposure takes place during the gap of shutter. (value 1-99)
Step 3: Set General And Length Setting
The topright quarter of the user interface controls the distances - step increments (ie the step size) and therefore the step mode (microstepper or stepper, ie microns or mm). The dropdown box on the right controls the mode: set a step length in mm(fast) for full 'stepping' mode, or fill in the same box and change the dropdown to micron(slow) for the 'microstepper' mode. "Beep after finishing" is exactly as it suggests, the control box will beep when your stack sequence is complete, and "return" means that the stage will return back to the position it started from when it is finished. The step length cannot be negative nor can it be anything other than a whole number.
Step 3b: SEND!
One last very important thing to note about the "general and length setting" is that together, the combination of settings that you choose in the topright section of the interface do have to be 'sent' as instructions - and every time you change anything in this topright section you do need to send the updated instructions again. So don't forget to press that SEND button!
Step 4: Step Test
The Step Test section of the application and the associated readout (Total distance) is there for testing, but I found it invaluable in terms of trying to work out how many steps you need to do for your stack. By starting in front of a specimen, then doing repeated step tests until you're behind the specimen, you're able to measure the total length of the specimen, and therefore gain an idea of the number of steps that you actually need to do in your actual complete stack. Unfortunately though the "Total distance" readout only applies to a total of an individual stack run, and does not show distance travelled as the machine moves. The latter would be a welcome addition.
Step 5: start stack
Unsurprisingly, START starts a stack, and SHUTTER takes one image. Both of these do exactly as you'd expect after an initial bug on the Pentax system was fixed. The supplied screw-in camera bolt, to fasten your camera to the rail, has now been shortened also, again to fix a Pentax issue and the system now runs perfectly Pentax. I also tested Canon using 5d2 and MPE, and it's all good on there too.
WeMacro Stack Examples
So, to explain, the stacking sequence is: start stack, start one step by moving the set amount and stabilizing for time set in (1). The device then allows "gap of shutter" time (4) for each exposure, the number of which in any one step is set in "shutter times" (3). Once all the exposures for one step is taken then the step is completed. This entire sequence is repeated a number of times, as set by "total steps" (2). Once the total steps is complete then the stack is complete. (numbers in brackets refer to steps in bullet list above in section "Second: Set Shutter And Step")
- Example 1 Macro Focus Stacking: 3 step stack, with camera exposure time of 1 sec, 1 shot per step, 2 sec "gap of shutter" allowed, settle time chosen of 5 sec. Total duration: (3*(5+2)) = 21 seconds:
The sequence is:
start stack
[ move a step (step 1) / wait 5 sec (settle time) / ((start 2 sec gap of shutter during which the 1 sec camera exposure is taken), do this 1 time) ]
[ move a step (step 2) / wait 5 sec (settle time) / ((start 2 sec gap of shutter during which the 1 sec camera exposure is taken), do this 1 time) ]
[ move a step (step 3) / wait 5 sec (settle time) / ((start 2 sec gap of shutter during which the 1 sec camera exposure is taken), do this 1 time) ]
end stack
- Example 2 HDR: 5 step stack: camera exposures of 2 sec, 3 shots per step, 3 sec "gap of shutter" allowed for each shot, settle time chosen of 6 sec. Total duration: (5*(6+(3*3))) = 75 seconds:
The sequence is:
start stack
[ move a step (step 1) / wait 6 sec (settle time) / (start 3 sec gap of shutter during which the 1st 2 sec camera exposure is taken), (start 3 sec gap of shutter during which the 2nd 2 sec camera exposure is taken), (start 3 sec gap of shutter during which the 3rd 2 sec camera exposure is taken) ]
[ move a step (step 2) / wait 6 sec (settle time) / (start 3 sec gap of shutter during which the 1st 2 sec camera exposure is taken), (start 3 sec gap of shutter during which the 2nd 2 sec camera exposure is taken), (start 3 sec gap of shutter during which the 3rd 2 sec camera exposure is taken) ]
[ move a step (step 3) / wait 6 sec (settle time) / (start 3 sec gap of shutter during which the 1st 2 sec camera exposure is taken), (start 3 sec gap of shutter during which the 2nd 2 sec camera exposure is taken), (start 3 sec gap of shutter during which the 3rd 2 sec camera exposure is taken) ]
[ move a step (step 4) / wait 6 sec (settle time) / (start 3 sec gap of shutter during which the 1st 2 sec camera exposure is taken), (start 3 sec gap of shutter during which the 2nd 2 sec camera exposure is taken), (start 3 sec gap of shutter during which the 3rd 2 sec camera exposure is taken) ]
[ move a step (step 5) / wait 6 sec (settle time) / (start 3 sec gap of shutter during which the 1st 2 sec camera exposure is taken), (start 3 sec gap of shutter during which the 2nd 2 sec camera exposure is taken), (start 3 sec gap of shutter during which the 3rd 2 sec camera exposure is taken) ]
end stack
- Example 3 star trails: 2 step stack, with camera exposure time of 30 sec, 1 shot per step, 40 sec "gap of shutter" allowed, settle time chosen of 10 sec. Total duration: (2*(10+((1*)40)))) = 100 seconds:
The sequence is:
start stack
[ move a step (step 1) / wait 10 sec (settle time) / ((start 40 sec gap of shutter during which the 30 sec camera exposure is taken), do this 1 time) ]
[ move a step (step 2) / wait 10 sec (settle time) / ((start 40 sec gap of shutter during which the 30 sec camera exposure is taken), do this 1 time) ]
end stack
WeMacro Presentation
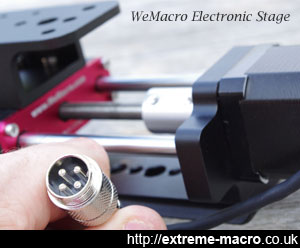
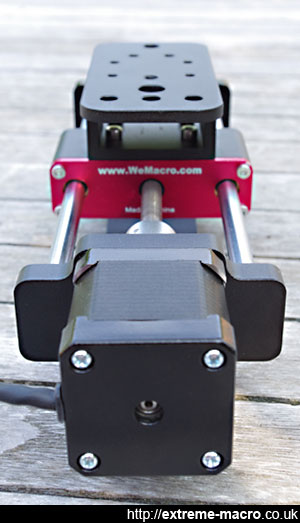
WeMacro electronic stage - we loved this screw on cable for its solid connection
OLet's face it, the overall presentation doesn't really matter as long as the rail stacks well, but nevertheless, the WeMacro rail really is a thing of beauty. On top of that, some of the choice of cables are commendably sensible, and I for one especially appreciate the solid locking 4-core cable connecting control box and stage - a low-cost part known to go quickly on other stages. That said, some of the final details of the WeMacro package could benefit from a little extra attention though.
The circuitry inside the control box has some unwanted 'give' when connecting the remote control plug, which may indicate a not so well secured internal circuit board. The WeMacro for PC GUI could be more intuitive with a few very very simple tweaks such as sections marked (1) (2) (3) and so on. Some of the writing could be a little clearer on the website, and the product could even come with some printed materials. Or, even just a PDF guide that users could print out for themselves would be nice. The bridge design of the stacker unit's camera platform makes attaching a camera balanced in the centre rather tricky as there's very little room to fit the bolt underneath. It really wouldn't be so awful if the error messages were vaguely comprehensible. And lastly, it is not very reassuring that when disconnected from power but connected to PC, the device still makes noises after stacking is finished, as if some residual current is being drawn through the PC. But these are small nit-picky things, no doubt all these little niggles will be sorted out within the weeks and months ahead as WeMacro start to iterate based on user feedback.
WeMacro Accuracy and Sensitivity
200 microns worth of WeMacro micron stack steps - judge for yourself. Starts at 00:47 sec.
WeMacro specs state 1µm steps, and there's a WeMacro-made movie on Youtube showing perfect one micron steps. Some doubt was expressed about this movie but in my (simple) testing I can confirm that using the same apparatus, WeMacro definitely can do 1µm steps as claimed (I filmed it, see movie on the right). I found that repeating the micron steps 200 times on a 200 micron dial showed that the device travelled a measured distance of 190 microns, so that gives an accuracy of +-5% or so. The device does occasionally miss a step, and also occasionally makes a step larger than 1 micron, but for most people doing insect macro at 1:1 to 5:1, single micron step errors are far too small to matter. Nevertheless, step size variation merits further research by WeMacro as it maybe indicative of microstepping stiction requiring tweaks in the microstepping waveform used by the controller, or nonlinearity introduced by the microstep drive when used at low torque and low speeds (ie stationary - as was initially the case with early versions of Stackshot).
So, if absolute micron level consistency is important to your work then you may want to watch this Youtube move I made of a full dial sequence of 200 micron steps to help you make a more informed purchase decision (WeMacro Micron test above). But, this was after I'd made it do a 1500 micron step sequence, so the device may have had a lot of backslash built up, throwing out the accuracy. To be fair when I did this same test before the long 1500 step run the accuracy going round the whole dial (200 steps) was 98%, and on steps more typical of insect portrait focus stacking rather than microscopy (ie 1:1-5:1, say steps down to 25 microns or so) the consistency is perfectly good.
When I queried the +-5% figure back with WeMacro, they provided the following explanation: The reason for 200 single micron steps making less than 200 microns physically measured progress is the way that stepper motors operate. Internally, the WeMacro stepper motor takes 3200 pulses to complete a full 1000 micron circle. This makes a single pulse equal to 0.3125 microns. To complete a one micron step, the motor advances by 3 pulses. [ed - an interesting difference between it and Stackshot, which takes 2 pulses to complete a 1 micron step.] Pulses are the minimum move in stepping: you cannot advance by 2.9 or by 3.1 pulses, a pulse is a whole number. For the WeMacro device, three pulses of the stepper motor actually equals 3*0.3125 microns, which is 0.9375 microns. 200 steps of 0.9375 micron steps equates to 187.5 microns total, so in fact, that 190 micron figure measured above in the Youtube movie above, which uses a Mitutuyo dial with a high degree of accuracy, wasn't actually entirely unexpected.
WeMacro Conclusions
WeMacro is a calculated alternative to the class-leading Cognisys Stackshot: Stackshot is expensive in China and therefore the company owners set out to design and create a product that would be cheaper for domestic and international distribution. WeMacro is competitively-priced and includes items which are optional extras in theStackshot package (ie a remote cable release). Competition is of course a good thing for us consumers, and at this cost the WeMacro stage will appeal to individuals and institutions unable to stretch to the cost of a Cognisys Stackshot bundle which costs close to twice as much ($549 + P&P at the time of writing against WeMacro's $299 + P&P). That said, WeMacro is a younger product, and lacks the software and firmware that has gone into Stackshot, which makes stacking with Stackshot such a comfortable experience.
With the WeMacro device for example, calculating out the length of stack or number of steps that you need to do is more of a chore than it needs to be. Stackshot does this beautifully on its control box: the Stackshot device allows the user to set the start position, move the rail and set the end position, then stipulate the step size (or the number of steps), and Stackshot does the rest, automatically calculating the step sizes or number needed depending on method, and showing the number of steps the device has completed as it works through the stack - ">Running: 3/10" means, in Stackshot speak, the device is on the 3rd step of a 10 step stack. Unfortunately the Wemacro lacks this; the "Total distance" readout on the application interface is only a calculation of "total steps" multiplied by "step length". WeMacro is a younger product, and lacks the software and firmware that has gone into Stackshot, which makes stacking with Stackshot such a comfortable experience The "Total distance" readout also does not take into consideration any distance or steps done forward or backward using the "step test" part of the interface. To further explain, as user, I mount a specimen, decide I want to shoot at 5x, switch on LiveView, move Stackshot to in front of the specimen looking at liveview, set that as start, then move Stackshot to the end looking at LiveView, and set that as end, set 25 microns as the step size and Stackshot then does the rest. It works out the number of steps needed. But, on WeMacro, the process becomes: I mount a specimen, decide I want to shoot at 5x, switch on LiveView, move WeMacro to in front of the specimen looking at liveview, then take successive test steps of 250 microns until I reach the end point I'd like to use. As I move to the end point I note the number of steps taken, and then at the end I know roughly the z-axis distance I need the WeMacro device to move to cover the whole specimen, then I divide that by the step size and put in the number. All very doable, but Stackshot takes care of this for you, which is easier. WeMacro have taken this difference between it and Stackshot on board, and have stated their intention to improve the software so that a methods of easily measuring required stack size and steps/increment will be added to future versions of the software.
From a hardware point of view, the WeMacro device also lacks any setting or configurability for such consistency factors as motor torque, motor speed and ramp time, which is something that may hamper its adoption amongst the more exacting of stackers, especially microscopy stackers doing stacks at high magnification. That said, WeMacro does now have a backlash compensation means: they have added a calibrate command to compensate backlash after the rail stops (recommended setting: 180 microns +/- 10 micron). A simple cheap off-axis loading also helps with consistency, especially at high magnifications (ie tie a rubber band to moving part of stacker to pull it, as such). The initial omission of any backlash mechanism was something that I spoke to WeMacro about as I reviewed it, and I am delighted to see that they added the request!
All that said, this is an excellent product at a great price, a perfectly reasonable alternative to Stackshot. We're in an exciting period in stacking development: PhaseOne and Olympus now already do in-camera stacking, there's now a 3D Stackshot from Cognisys, and the electronic rail marketplace is set to become even more competitive with the introduction of another player in the electronic stage marketplace, MJKZZ with its multiple electronic stages, SnS stage and its DIY macro rail. WeMacro is also an ambitious young company, and very willing to listen to feedback and product suggestions from folk with stacking experience, so it would not surprise me if the product develops and improves rapidly in the months ahead. As it stands it is already very decent lower cost budget alternative to Stackshot, and may have the happy effect of making focus stacking even more accessible than it already is today.
Other WeMacro Products
WeMacro has continued to expand its portfolio offerings and came out with various other macro products in 2017 that caught my eye:
WeMacro MicroMate
The WeMacro MicroMate is a unit specifically designed for microscope stacking, and attaches to the fine focus know of the microscope. It is as far as I know the only such unit on the market, giving a premade solution to a problem that always required attaching a stepper motor yourself previously. The unit is very well built and works as advertised, using a 400 step 0.9 degree stepper. The height of motor can be adjusted from 2cm - 18cm so it can be married up to Nikon, Olympus etc. With the step length set as 1 micron, it will take 2132 steps to do a full circle, which is more than sufficient for high magnification work.
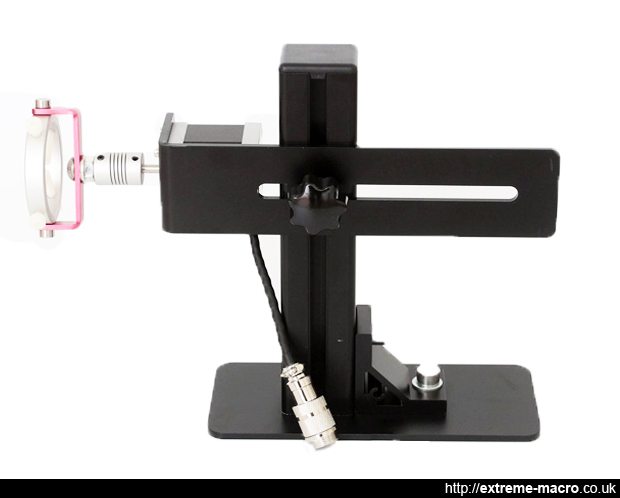
WeMacro Micromate microscope stacker
WeMacro Vertical Stand
This is a phenomenal value for money product when you are just starting out with stacking as it prevents the need to construct your own stand out of DIY parts which, whilst fun to do, can be an expensive and frustrating exercise. The WeMacro Vertical stand comes with all the parts illustrated, including two rough positioning stages and the specimen holder. The pillar is 42 cm hight which is fine for mounting the wemacro stacker, and there are holes on the bottom so that magic arms can be attached. I have 4 on mine and use this device with continuous lighting. WeMacro has done well to listen to what stackers want and there are 4 large rubber footpads to reduce vibration. At this price ($99, 2017) I really cannot recommend this piece of apparatus enough!
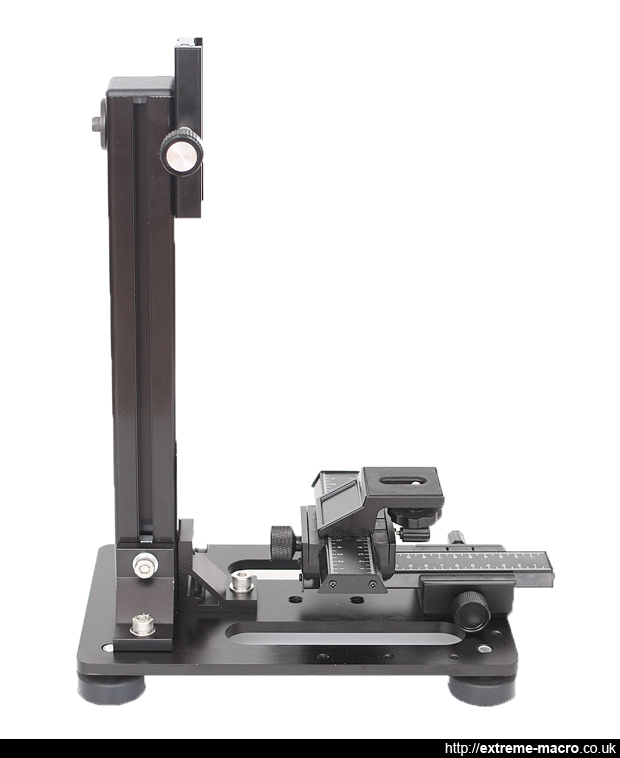
WeMacro Vertical Stand
Related Articles