Shooting Focus Stacks
by Johan J Ingles-Le Nobel
Last updated September 01, 2017

There is a tremendous amount of variation in how people typically shoot their focus stacks, and there are various steps to starting your stack that you might want to consider before shooting your own. This is my focus stacking workflow.
File Type
Focus Stacking Walkthrough
1 ➤ The focus stacking workflow
2 ➤ How to prepare a focus stack
3 ➤ How to shoot a focus stack
4 ➤ Software tools for focus stacks
5 ➤ Postprocessing tools for focus stacking
All of my focus stacks are JPEGs which goes to show that if you have decent lighting and get things ready beforehand, the file format is not as big concern as you might think. That said, the 16-bit TIFF preserves the highest quality and keeps the most options open, but converting all of these to RAWs will take a long time and your PC may not have the resources necessary to save all the files. For my focus stacks I do shoot JPEG, but I carefully set colour balance and exposure beforehand to make sure that I do not have to adjust 100s of photographs after the stack has been completed. RAWs and TIFFs do offer a great deal of flexibility but the demands for disk space soon become obscene.
Focus Stack Step Size
The required step size can be computed roughly as 2cn(m+1)/(m*m), where c is the circle of confusion, n is the f-stop you're using on your lens, and m is the magnification. c is a calculated value based on your sensor size: to err on the side of caution you can use a value of 1/1500 of the sensor width.
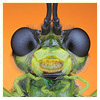
Having done a few test shots you may then decide to slightly increase or decrease the step size based on whether you see focus banding with your subjects. Random textures can tolerate a larger step, regular structures such as fly eyes may require a smaller one. Ultimately though the best settings are determined by experiment or use this focus stack step size calculator.
Before The Stack
Before starting my focus stack, I clean, spread, card and pin the subject and have it ready to be moved into position. This is kept under a box/bowl/container to keep dust away. I switch on the field monitor 30 minutes before starting to ensure that it warms to the correct colour temperature.
1. Set Imaging Gear
I set camera for ISO, exposure, image mode and exposure mode and put it onto liveview mode. I check flash is on the right mode and is set at the preferred setting. I check that lens is set to correct f/stop if you're using a reversed enlarger lens (very easy to forget). I double check that the remote delay is set to the right setting in seconds. I shoot a few test flash shots to warm the flashes up. On your lens you can use a larger f-number to get shorter stacks but also more diffraction blurring, or a smaller f-number to get sharper images but more shots to merge.
2. Set Background
I have this stupid thing about backgrounds so I always do some exposures to test out the background first. I use photoshop and a smallHD field monitor for the background and I have a master file which has all sorts of backgrounds that I can call on.
I'll shoot a few testers first and import them back into my PC to see what it looks like and if I need to make any adjustments first. I do pay particular attention to noise at this stage because dark backgrounds tend to be noisier so there's always a bit of a compromise to be made here. Noise can be removed afterwards but it's better to not have any in the stack in the first place.
3. Set Diffusion & Light
Once I'm ok with the background I use a pin to test out the diffusion next. A black sewing pin will reflect your diffuser and show you what the light looks like from the object being photographed's point of view and how far it extends etc, whether you need to move it back or forward or to the side and so on. Fiddling about with diffuser supports can be quite cumbersome and even a small movement can make a difference. Doing this with a black pin makes for the harshest reflections and specular highlights so when you move onto a specimen for a stack it should, if anything, look nicer.
With a focus stack, you want to set your camera onto its manual settings, switch off autofocus and use the same camera settings throughout your stack for everything from ISO to colour temperature, f/stop, focus and shutter speed. This will give you consistent images to work with, rather than the camera deciding based on its internal calculations. If images are too different when you import them into stacking software then this is likely to cause poor results. In fact I usually pop off my flash a few times before doing a stack just to make sure it is warmed up properly and the exposures are reasonably similar.
4. Check All Batteries
I always do a complete battery check at this stage as there's nothing worse than running out halfway through your stack. I usually put always put spares in for recharging the night before as well so I always have a spare set on hand anyway. Liveview in particular eats up batteries like nothing else, and heats up your camera which is why I now have an AC power source instead for my camera when I do a stack.
5. Mount Subject
I take the cleaned and pinned subject and move it onto the universal macro stage. I use positioning lights and liveview to judge the angle, then take a few test shots to make sure that the background, diffusion and light setup will achieve the results that I desire.
6. Front & End
I move the camera out to the stack peripheries to make sure that the lighting and diffusion is set up ok to work at both extremes and take a few testpics. This is usually slightly easier if you have liveview on or if you output your display via HDMI to another monitor. Make sure that your camera and subject are aligned in a line, and that your subject does not shift towards a corner during the course of a stack. Miscalculations happen in tight diffuser or working distance situations and you want to make doubly sure that you can complete the whole run with some room round the edges spare. I then start the actual stack at about 25% beyond one of either of the ends just to make sure that I have enough spares just in case. You can start your stack at either end, it doesn't really matter if you start from the front or back. You also want to make sure that you allow plenty of space - more than you think you need - round your subject as well: large background borders give you nice latitude in post stack editing and also compensate for the edge area that you'll probably lose due to stacking software aligning the subject as well.
7. Format Camera
I tend to format my camera just before the shoot so that all the images end up in the same folder and nicely numbered when I move them over to my PC. Just a personal foible that may not matter to anyone else. I prefer JPG myself but people shoot in all sorts of formats.
8. Shoot The Focus Stack
Finally on with the stack. I generally switch the lights off in the room at this point and put a cord across the door so that annoying children don't come in and disturb the progress of the stack. At this point you will choose one of two methods of doing your stack, depending on your apparatus. Using apparatus to move your camera and perform the stack slice by slice is the more versatile method, as you'll be able to do all magnifications and use any optic, 3rd party or otherwise, that fits onto your camera. Alternatively, some camera systems now permit in-camera stacking, refocusing the lens at a different point for each slice. This is a great introduction to stacking although it does limit stacking operations to only those lenses that are enabled (ie excludes manual reversed lenses, microscope lenses etc). So for those people on such systems, everything other than the movement apparatus still applies in in the focus stacking walkthrough. Excellent examples of cameras that enable stacking in such a manner include the Olympus OMD EM1 and the Nikon D850.
I use a Stackshot which automates the movement between frames for me so at this point I'll let it do it's thing. If you have a manual stage it is exactly the same process except you'll just need to move it manually between frames. Depending on your camera make you may or may not want to switch off or to liveview. In my case (Pentax), liveview introduces a delay every shot as the camera returns to its liveview after taking a shot, and it also eats battery, so I usually just switch it off and have the camera do its stack blind. You really also want to do everything to avoid vibration so having a small 3s delay after pushing the trigger via remote for each shot will do no harm.
During the focus stack, the apparent size of your subject may change as you move across plains of focus. Whilst this does not matter as good software such as Zerene Stacker compensates for this, do make sure that you can fit your subject in at both ends. The last thing you want to happen is getting halfway through a stack and finding that the change in magnification means your frame is not big enough. Telecentric lenses avoid this, but these are very expensive.
A nice thing to add during the focus stack is a few frames at higher aperture setting as the last frames. The reason for this is to provice a smoother more gradual transition between the biting sharp in focus part and the completely out of focus background. The can be a very binary transition between a wall of focus and a wall of out of focus - adding a few high aperture frames gives you the opportunity to make this transition more gradual and add some out of focus context by retouching them in where appropriate.
The million dollar question is whether to move the camera or the subject during the focus stack. I prefer to have my subject fixed with - crucually - the light shining on that subject remaining the same throughout the stack, and to only move the camera, but both approaches work.
Next: Focus Stack Processing
Related Articles