Extreme Macro Microscope Objectives
by Johan J Ingles-Le Nobel
Last updated August 31, 2017

Microscope "objectives" is the name for the lenses that are used in microscopes, and provide more or less the only way to go beyond 10:1 macro photography, although they are also used to cross the 5:1 macro threshold.
less diffraction with microscope objectivesI personally tend to use a microscope objective beyond 5:1 because there is less diffraction with microscope objectives. Bottom line: a microscope objective has a lower f/stop than reversed enlarger lenses will give you at extreme magnifications.
The Two Types Of Microscope Objective
The microscope objectives used in extreme macro can be divided into two camps: infinity objectives and finite objectives.
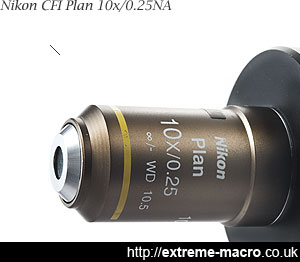
Nikon CFI Plan 10x/0.25NA 10.5mmWD objective, an excellent infinite objective for 5:1 to 10:1.
An infinity objective is one that has to be mounted in front of an infinity tube (ie a lens mounted on the body focused at infinity), whereas a finite objective has to be mounted a specified distance from the image sensor. A Nikon CFI Plan 10x/0.25NA 10.5mm WD objective is an superb infinite objective for 5:1 to 10:1. There is no fixed answer as to which method is 'better'; some infinity objectives are stellar performers as are some finite objectives and it all really boils down to individual testing, preference and convenience.
Chromatic Aberration
The main technical issue using microscope objectives for extreme macro to bear in mind is chromatic aberration.
In microscopes, chromatic aberration is cancelled out by corrective eyepieces, which of course we do not useIn microscopes, chromatic aberration is cancelled out by corrective eyepieces, which of course we do not use when connecting a microscope objective to a camera for macro.
This does mean that there is a certain amount of trial and error involved because some of these objectives by themselves can and do show quite significant colour fringing.
Why Use Microscope Objectives For Macro?

Diffraction softening in extreme macro. On the left: f/4 used at 3:1 so effective f/16, on the right effective f/100 (using m42 iris on a reversed Componon 35). Full size images here (f/16) and here (f/100).
Microscope objective let in more light than reversed enlarger lenses, and are therefore less prone to diffraction softening than reversed enlarger lenses. Diffraction softening is a loss of sharpness or resolution caused by photographing with small f/stops and is a well known limiter in extreme macro photography. Diffraction softening isn't such a big deal when you're at 1:1 and below, but once you start venturing towards 5:1 then you have to take notice of it. Diffraction softening helps explain why uninformed photographers using mp-e 65 get poor results, because they're using the lens at 5:1 at f/16. f/16 at 5:1 is an effective aperture of f/96, well into diffraction softening territory.
Buying a Microscope Objective
Unfortunately at this point I do feel the need to add a note of caution about buying microscope objectives, be it online or from a local shop. Some of my fellow stacking friends have had incredibly poor luck buy buying an objective and finding out that the results using it are shocking. First, and most importantly, if you buy an objective from anywhere you must only buy one that has an unconditional option to return the objective within a certain time period. Do not be tempted by any other cheaper offer that lack this option. Secondly, shoot a stack or images through it as soon as possible to see the result, but also check using a light shone through it and macro photos of the lens at both ends to make sure that there is no dust or debris inside the objective. Dust or debris will indicate that the objective has been disassembled improperly, and you should immediately return the optic if this is the case. Reassembling a disassmbled microscope objective is not something that can be done outside a proper optical laboratory, and a disassembled optic will almost always have a very poor optical quality.
That said, like lenses, small scratches or marks on the front element of an objective usually make little or no difference to the final image, and the abberation only manifests itself in a marginally higher level of overall greyness. Filling in the scratches or marks with black, ie colouring it in with a sharp sharpie or other black felt tip market minimises any optical abberation. Scribtol black calligraphic ink has also been recommended for this task.
Microscope Objective Designations
The designations on microscope objective will tell you whether or not your objective is an infinity or finite objectives: infinite objectives have an infinity symbol on them and finite objectives tell you the sensor plain distance (usually 160 which actually means 150mm). There is, however, a quite bewildering array of microscope objective designations, so be careful what you buy.
One of the more useful pieces of information for extreme macro photography that is usually on an objective is a sense of its working distance. In general, the objective working distance decreases as the magnification and numerical aperture both increase. Objectives can have a variety of working distances, ie extra long working distances (ELWD) and super long working distances (SLWD) and are usually marked as such. In Particular, Mitutoyo's objectives are world-renowned for setting the standard of excellence for long working distance microscope optics but are also priced as such.
Diffraction Softening
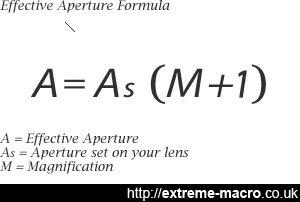
For extreme macro magnifications (ie >=1:1), a (crude) estimate is: Effective Aperture = Lens Aperture x (1 + Magnification).
For example, if you are shooting at 4:1 magnification, then the effective aperture for a lens set at f/22 will be somewhere north of f/80
Diffraction is an unavoidable physical limitation which limits the resolution of photography, no matter how many megapixels your camera may have. It happens because light begins to disperse or "diffract" when passing through a small opening (such as your camera's aperture). This effect is normally negligible, since smaller apertures often improve sharpness by minimizing lens aberrations. However, for apertures with macro magnifications, this adds up, and your camera becomes diffraction limited.
The reason the effect is so much more severe for us macro people is because of the difference between aperture on the lens and your effective aperture. You may think you're using f/8 (not diffraction limited) when in fact you're actually using f/64 (very diffraction limited). For extreme macro magnifications, a (crude) estimate is: Effective Aperture = Lens Aperture x (1 + Magnification). For example, if you are shooting at 4:1 magnification, then the effective aperture for a lens set at f/16 will be somewhere around f/80! There are calculators for bellows and extension tubes that show this effect.
Objective Apertures
Of course, in order to use the formula above, you need to know your objective's aperture... which is normally not given. Objectives measure their light differently than photography lenses, and use something called 'numerical aperture'. But you can convert between the two using NA to aperture converter:
Infinite Objectives
better to use a telephoto lens for the tube lens rather than a macro lensInfinite objectives are mounted, again using specially bought adapters, in front of a lens at infinity: I have used these in conjunction with 100mm, 135mm and 200mm lenses to good effect.
One thing to slightly watch out for is that it is better to use a non-macro telephoto lens for the tube lens rather than a macro lens.
The front element of macro lenses can be sat quite far back inside the lens whereas we want the distance between the front element and the objective to be minimised for image quality.
Finite Objectives
A finite objective is usually put in front of an adapter which connects to macro extension tube or bellows. Empty air of a certain predesignated distance is required between objective and sensor for optimal image quality. We can and do use finite objectives at distances different to those that are recommended, but this can give rise to various optical issues including lack of full sensor coverage, astigmatism & decreased resolution. Finite objectives come in a variety of threads but a common thread is the RMS thread (Royal Microscope Society); various adapters are available that connect to your extension tube or bellows thread.
Metallurgical Objectives
Objectives designated as metallurgical are designed to work without cover glass, with opaque subjects. At higher extreme macro magnifications (ie 20:1), the 'no-cover-glass' aspect is crucial for good image quality. Their use with opaque subjects implies either through-the-lens illumination, or sufficient working distance to shine light in from the sides.
Fluorite Objectives
Fluorite (or fluorite designated objectives) uses a different type of glass with better transmission properties than standard glass, so these objectives tend to give better results but at a higher price. Fluorite was used in UV lenses as well, and its UV transmission is better than standard glass. Fluorites are also known as semiapochromats, and should give a better colour correcting than achromats.
Using Microscope Objectives
Although some objectives have an iris, most microscope objectives do operate at a fixed aperture. The biggest challenge at magnifications above about 5:1 is vibration On infinite lenses, stopping down the aperture on the lens causes vignetting rather than greater depth of field. The biggest challenge at magnifications above about 5:1 is vibration, which is why flash rather than continuous lighting is recommended, although continuous lighting is usable if your equipment produces minimum vibrations (for example if it uses EFSC (Electronic Front Shutter Curtain). The second biggest challenge using objectives is working distance The second biggest challenge using objectives is working distance (distance from the front of the lens to the specimen). This can be severely limited (ie part of a mm), which is why microscope objectives marked ELWD (Extra Long Working Distance) command a premium price.
Adapters, Bellows, Extension Tubes And Metering
Your camera, depending on brand, may or may not require a 'chipped adaptor' in order to be able to meter effectively through an objective, this is something you should check with your camera's manual.
You may or may not find that you have flare or an undesirable greyness in your photography with bellows - this can be due to internal reflections inside the bellows, tubes or adapters, so lining those with a light absorbing flocking material is recommended.
Using a Zoom Lens
Given that infinite objectives require a tube lens to focus the rays onto the sensor, one idea that crops up a lot is the use of a zoom lens as the tube for variable magnification. This is a worthy goal and our life would be a lot easier if we did not have to change the tube lens for different magnification, and the jury is still out. Some lenses apparently work well (Canon 70-200/4 on FF, 200-135mm) but others don't. That said, many people who have tried this, myself included, report disappointing results and vignetting with zooms, so your expectation should probably be lower rather than higher trying such an approach.
Field of View
One important thing to bear in mind when using microscope objectives is that quality coverage is only guaranteed for the eyepiece field diameter of microscopes which is 26mm. In extreme macro we are not using them for the purpose that they were expected to be used. Coverage over and beyond 26mm is a bonus and not every objective gives a great result in these outside areas: this pertains especially for APSC and full frame 35mm sensors. This means that there are simply no set formula for predicting if an objective will perform well and this is largely a matter of individual trial and error and research (so if you buy one speculatively you should retain the ability to return it if it proves unsuitable). But there are some known performers such as the Nikon CFI 10x listed here.
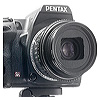
Generally, the higher the magnification you pursue on a given objective, the better the result you can expect (ie using a 10x and 5:1 means the bad area shows on the edge, but not at 15:1 because you're showing a smaller area, the centre, which has higher quality), but there are other factors that start coming into play at the higher magnification end like empty magnification and diffraction softening, so like anything it's a compromise. Likewise sensor; since you're showing a smaller area on a smaller sensor that's likely to get you the cleanest result over the whole frame. So you can get great extreme macro results with small sensor cameras like Pentax Q with objectives, because you're only using the very centre of the image.
Microscope Markings
Microscope objectives tend to be marked with all sorts of acronyms that mean something. I will add to this guide in time.
Marking |
Stands For |
Useful for |
| OFN | Objective Field Number | Maximum field of view number of the eyepiece for which the objective is designed to be used. Example: OFN22, which is what the Nikon CFI Plan 10x is now marked with (early 2014). Many Nikon objectives are now marked OFN25. |
| DIN | Deutsche Industrie Norm | A DIN objective is designed to be used on microscopes that have a distance of 160mm separating the eyepiece from the objective lens. DIN is the name for this standard arrangement, it is a German term. DIN lenses aren't better than non-DIN but they will be interchangeable from one DIN microscope to another. They also have a uniform thread. |
Aiming Your Objective
If you are using an objective for extreme magnification you might find it difficult to see what you are aiming at. It is possible to shine a torch through the viewfinder of your camera and that should show you the working area, but an even better solution is the use of a laser. A cheap laser shining through the viewfinder of your DSLR will show precisely where your camera is aimed and when the lens is in focus. There is a great writeup with all the parts about this here.
Related Articles
