Focus Stack Processing
by Johan J Ingles-Le Nobel
Last updated August 31, 2017

Focus stack processing is the act of taking your separate images and combining them into one unified whole final image. Various methods can then be used to make the final outcome of the focus stack better during the following post processing stage.
Substack Slabbing
Focus Stacking Walkthrough
1 ➤ The focus stacking workflow
2 ➤ How to prepare a focus stack
3 ➤ How to shoot a focus stack
4 ➤ Software tools for focus stacks
5 ➤ Postprocessing tools for focus stacking
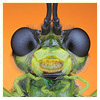
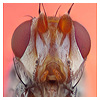
First, a word about slabbing, also known as substacks. Shooting a stack is all well and good but a stack on its own is a rough instrument that doesn't always give the cleanest result for only a certain horizontal section. When there are things both in front and behind a certain set of hairs on a stack then a whole stack on its own will show the out of focus effect of both those set of things.
However, slabbing can do away with this problem because you're just stacking the slab of images that deals with the hairs, thereby avoiding the fuzzyness of the other things. Slabbing is a time consuming and fiddly addition to the standard stack but there's no doubt that it makes your final stacks better. Use ZereneVS, Slabberjockey, BugSlabber or MakeSubStackingScript ( Windows | Mac ) to generate your substacks.
Focus Stacking with Zerene Stacker
- Default Pmax gets excellent results and that's the best method to start with. But if the detail isn't sufficient, then you'll want to improve the result by slabbing.
- Slabbing: first generate PMax substacks.
- Either use Slabberjockey, ZereneVS or MakeSubStackingScript ( Windows | Mac ) to generate the substacks in PMax mode. I personally use ZereneVS but great things are said of the other two as well.
- Decide on the amount of images to blend in the slabs by looking at the trickiest areas and the amount of detail overall. More detail means smaller slabs and longer processing time. I usually have an overlap of about 50% between slabs, this seems to give me the separation that works for me.
- Next: stack PMax substacks overnight on DMap.
- Permutations are a bunch of Dmap combinations of all or some of the PMax slabs at different settings. Dmap can be a bit of a mystery so I have a heap of different preset settings set that I run as a batch job overnight and then use the best parts from each in the final image. It's a bit like a manual version of the 'variations' tool in Photoshop.
- Next: take the best permutations result and use this as a base.
- Retouch from the other permutations, substacks and individual frames back into the base.
- Pmax gets you the hairs and the outlines but Dmap gets you the detail.
Focus Stacking with Helicon Focus
Helicon Focus supports JPEG, TIFF, BMP, PSD and various RAW formats with 8 and 16 bits per channel. Helicon Focus has three blending modes and calls them methods a, b & c. Method b corresponds to Zerene's dmap, method c is like Zerene's pmax and method a is a mix of the two. Helicon Focus supports retouching in the Pro edition, but unfortunately it requires a workaround to achieve something similar to slabbing in Helicon Focus, and there are no third party slabbing plugins like there are for Zerene. So whilst the Helicon Focus Pro edition has a retouching palette which includes colour and brightness options, brushes, and photoshop-like cloning from other areas, nevertheless these are all still limited to retouches using single frames and queue outputs only of the existing queue. These are dealbreaker lacks of functionality on the part of Helicon Focus for serious stackers.
- Open Helicon Focus and browse folder to select images to be stacked.
- Set parameters: rendering method, radius, and smoothing. In most cases, the default values will work well - choose method a to start with as it's a reasonable compromise between method C which is better for stacking complex overlapping structures such as hairs, and method B which works better for stacking smooth details without much 3D variation or overlap.
- Press the 'Render' button to start stacking. You can change the radius and smoothing settings to see which work better.
- After retouching via the retouching tab, move to the 'Saving' tab, and press the 'Save' button.
Focus Stacking with Photoshop
Photoshop is a common tool and can stack images. Although Photoshop is not a serious stacking tool for stacking as it does not have blending, smoothing and method controls like the class leaders Zerene and Helicon. Nevertheless, for the benefit of those with Photoshop, the steps would be as follows.
- Have your files in a ready directory for processing
- File ›› Automate ›› Photomerge
- Browse for the files, untick 'Blend Images Together' tickbox, choose 'Auto' Layout on the left and press 'ok'
- Photoshop creates a focus stack for you
Next: Focus Stack Post-Processing
Related Articles