Lighting For UV Macro
by Johan J Ingles-Le Nobel
Last updated December 02, 2021

For ultraviolet-induced visible fluorescence photography, all you need is a 100% UV excitation source with no visible light spill and a UV barrier filter. In fact UV UVIFL (UV-induced visible fluorescence photography) has never been more accessible than it is today, and combining this with extreme macro has the potential for some quite fascinating and unusual macro images.
Reflected UV vs. UV Excited Fluorescence
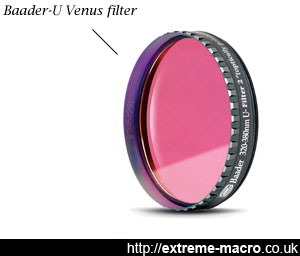
The Baader-U Venus Filter, currently the best filter to ensure that your excitation source (ie UV torch) emits only UV, so it doesn't produce those gharish purple overdoses (which is actually visible light spill). Pink and mirrored on one side, yellow and mirrored on the other, military spec and it deliberately rattles in the filter. Worth a peek, it's almost certainly unlike every other filter you've ever used
Reflected UV photography is a different ballgame altogether which requires bespoke uv-transmission optics, filters, lighting and ideally a converted camera - not an exercise for the faint hearted.
Reflected UV photography is the type of UV photography that produces monochrome results because they are in the non-visible spectrum so colour does not apply, and show a bulls-eye pattern on yellow dandelions.
Ultraviolet-induced visible fluorescence (UVIFL, also abbreviated as UVIVF) photography gives a result in the visible spectrum with primarily reds, blues and greens, and more.
UV fluorescence is being used in some very interesting research fields, for exmple the Chelsea Technologies tryptophan sensor, which enables sewage monitoring
Exciting Fluorescence
The way it works is that certain frequencies of UV 'excite' fluorescent materials (fluorophores), which we then see as an extra bright colour and/or light source in the visible spectrum. Different fluorophores are excited at differing frequencies and the limitation with consumer photography is the ability to obtain the UV illumination in the right UV frequencies at the right strength at the right price.
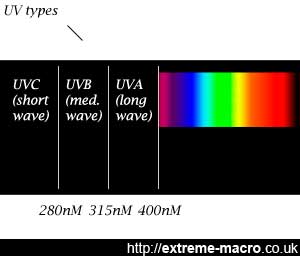
The ultraviolet spectrum. UVA (long wave UV) is relatively easy to obtain a light source for and photograph but UVB and UVC are more challenging. UVC starts at 200nm.
Minerals excite using short wave (UVC) and medium wave (UVB) UV light, but these light sources are difficult to obtain. Fluorophores are in fact not especially common in living organisms, and very few organisms are known to fluoresce, but they do exist. For example, some high elevation plants have a fluorophore wax skin that converts harmful solar UV into blue light that can be utilised for photosynthesis.
Maybe it's my imagination but a theme of UV-excited visible light fluorescence seems to be existence in low-light areas (ie under the sea, deep in undergrowth). The movie Avatar had night time fluorescence was maybe not a million miles away from being plausible, and if you want to see something absolutely stunning just search for some night time fluorescence coral dive clips on Youtube. Fluorescence, both UV-excited and visible light excited (blue) is in fact more common under the water than above the water.
Currently, long wave (UVA) UV is our main source of consumer purchasable fluorescence excitation. Medium and short wave UV can also excite and give fluoresence, and are used in the world of minerals, but are more niche and consequently, more expensive. Specialist minerology UV sources run into hundreds of dollars.
Portable UV For Photography
I have tried a variety of other portable light sources for UV fluorescence photography and whilst they all work to a certain degree, some work better than others. The main thing most of the smaller torches fall down on isn't the light frequency but the brightness of the UV relative to the amount of non-UV visible light (ie blue) contamination that also shows. There are some stonking industrial blacklight torches available but they are also industrially priced so out of my budget.
For consumer pricing, the MTE U301 and NightSearcher UV365 both use the 365nm class-leader Nichia NCSU033B LED, and are priced in the £100-200 range. They do look identical, so I can't help but wonder if they're both rebadgings of some B2B product that is not available directly to consumers (yet). Nichia NCSU033B LED emits 50%+ at 360-370nm. There is also the Nitecore CU6 which uses the CREE XP-G2 (R5) LED, costs £100 and is specifically designed for forensic use. LED technology is currently advancing rapidly and better and brighter are both only a matter of months away.
UV Fluorescence Shootout
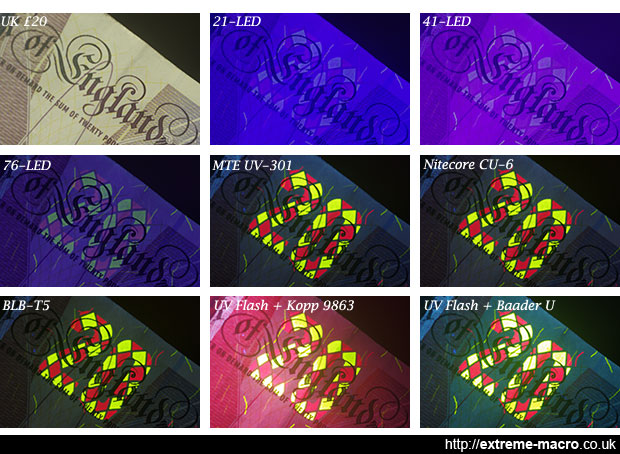
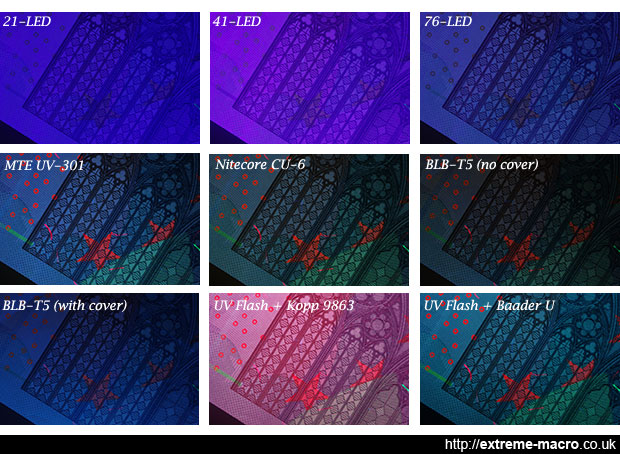
I did a simple test using the UV-fluorescent security feature of a British £20 note to test the effectiveness of some of the uv light sources that I have acquired. Seems to me that the 21 and 41 LED torches show little useful fluorescence, any signal being drowned out by visible blue and violet. The 76 LED torch is the best out of the 3, but pales in comparison to the CU6 and the Nichia MTE UV-301. The cheap BLB is actually very clean, albeit also very weak. As expected, my UV flash performs better with Baader-U filtration than it does with Kopp 9863. All shots taken with Wratten 2a filter over the lens.
The second shootout that I did is perhaps a little more useful, as the 20 Euro note has a small panel below the two orange stars that fluoresces in a pale yellow/green under a good UV source, but is also easily swamped if there is too much visible blue present. This makes it a good indicator for blue pollution. What is comical is the extent to which your bank note checker device manages to make itself a bit useless because the plastic cover over the BLB-T5 bulb is itself fluorescent, giving out blue light. With the cover on, the blue given off by the cover swamps the UV fluorescence, but with the cover off the UV fluorescence is visible.
Premium UV Torches
For my purposes and the purposes of this discussion, premium UV torches exhibit 365nm or thereabouts light only, and lack a significant amount of visible light (purple or blue) overspill. Although I do not have the tools to empirically test these myself, it is not difficult to spot the difference between a good torch that on which the UV fluorescence outweighs the blue or purple visible light spill. These torches are quite expensive. Please be aware that the market and eBay seems to be flooded with cheaper torches that also claim to be 365nm using LEDs from various manufacturers such as CREE, AOT or even unnamed. I have not seen any tests or comparison images comparing these to the more expensive ones below that would convince me that they have no blue/purple spill in 390+ territory. If you have any information to the contrary I would be delighted to hear from you!
MTE UV 301 UV Torch
The MTE UV 301 Torch uses the famous Nichia NCSU033B diode and is several orders of magnitude brighter than the Nitecore Chameleon below. In comparison of its UV output it has a tighter central beam and according to the advertising bumph, gives off "approximately 658mw of UV LED Power". The MTE UV 301 Torch is not as 'clean' as the Nitecore and there is marginally more blue and violet light spill but this is easily controlled with a UV pass filter over the torch itself. MTE UV 301 Torch shows much more than the Nitecore and a nighttime safari round the house shows all manner of things that none of my other UV light sources do. I bought this item through eBay from Germany and it arrived in a couple of weeks; it can also be purchased directly from the MTE website. This is a super fun torch to use and between this and the Nitecore Chameleon, I hope that I have enough now to be able to make some sort of a start on this. This MTE UV 301 Torch also uses an 18650 battery and came supplied with a recharger kit, it is very solidly made and in the hand it feels and acts as a quality piece of engineering. One thing to bear in mind with this torch is that it produces quite a narrow beam of UV. The Thorlabs UV diffuser that I ordered does work to diffuse the UV but also weakens the signal considerably. 2014 Q2 Cost: £150
Nitecore CU6 Chameleon
The Nitecore CU6 Chameleon was the first of two relatively high-end UV torches that I decided to buy to pursue UV fluorescence photography a little further. The Nitecore CU6 Chameleon is a relatively thin black torch, with normal light adjustable in 5 brightnesses, red green and blue light, and a UV light, beautifully made. It also has a mildly disturbing strobe mode. It takes an 18650 battery - coincidentally the same as a Stackshot Stacker battery - and rechargeable 18650s and chargers are easily found on eBay. First impressions are definitely very good - there is a marked difference with the 76, 41 and 21 LED torches insofar that there is much less visible blue/violet contamination when using it for UV fluorescence. But one LED on its own isn't the brightest light source so I may need to buy more. Looks like a good buy. Comparing it to my MTE UV301, the output is weaker but cleaner (less spill into visible blue), and that can be seen in the photos as greys are grey rather than green tinged. Bot both the branded CU6 and MTE are streets ahead of cheap eBay UV torches. 2014 Q1 Cost: £130
2017 Update: Convoy S2+ 365nm Nichia UV Waterproof LED Flashlight (currently only £15!!)
As anticipated, the price of UV chips on the marketplace has come down quickly, and there are now budget-priced UV torches out there in 2017 that have the same quality as premium-priced UV torches such as the Nitecore CU6 or the MTE UV 301 had in 2014. Currently (early 2017) there's a Convoy S2+ 365nm Nichia UV Waterproof LED Flashlight out on the marketplace for even less, only £15. According to the sellers this UV torch uses a Nichia NCSU276A chip (not NCSU033B as some reports state) and whilst it lacks the zoom ability that the previous version had, nevertheless it produces a better than expected central focused spot of UV, and in the ideal quality 365nM range. The torch takes an 18650 battery and is smaller than the other quality UV torches I have - just a shade more than the width of my hand. This is a phenomenally good value purchase for anyone considering tinkering with autofluorescence (microscopy) or UVIFL (Ultra Violet Induced visible FLuorescence (regular UV photography). I just can't recommend this torch enough as it is such good value at this price! (no I'm not affiliated in any way!!). I don't know if the price will stay this low for long though. Current 2017 Q1 Cost: £15
Value UV Torches
There are plenty of good value UV torches around that let you dip your toes in the water and see some UV fluorescence without breaking the bank. The result tends to be very blue or purple so whilst these pick up UV fluorescence they also add blue and purple. Of course you can use colour correction tools in photoshop to get an interesting result. That said, these are definitely budget options and for decent UVIFL images I'd definitely recommend the branded MTE or CU6 torches, as opposed to value LED array torches like eBay torches or cheap sub £25 single LED UV torches that look like the MTE or CU6 model, but contain non Nichia LEDs that have intolerable spill. Also beware of counterfeits; MTE has had problems with this in the past and it is better to order directly through its website.
76 LED UV Photography Torch
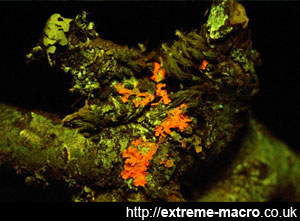
Some fluorescent lichen on a tree in the back garden, shot with a cheap 76-LED ebay torch. This lichen is yellow under regular light and together with the orange lichens on concrete is one of the more vividly coloured things in my garden using UV fluorescence excitation.
Having tried various light sources, the best value for money lowend UV torch that I can currently recommend at the time of writing (2014) prior to some tinkering with a full spectrum flash conversion and the MTE and Nightcore UV torches above is this blue light and UV Torch with 76 LEDs from eBay. Unlike the smaller torches that work only with objects that are very near, this gives out a relatively generous amount of UV light because of the 76 LEDs. So with a high ISO setting you can use relatively normal shutter speeds.
This UV torch has an optimal peak wavelength of 390nm which is inside long wave UV territory, and it can reveal all manner of things including bacteria, mineral and plant fluorescence. But be aware there's also a lot of visible light contamination, as there is on all these cheaper LED products. I use this torch with my equipment either rigged up in a horizontal configuration or with the torch clamped on the hotshoe using an eBay "mini hotshoe ballhead" with a connected eBay "super clamp" and a typical setting would be f/4, 1/60, ISO1600 using Tamron 35-80. In all fairness I just use the Tamron for convenience and I may well move to an vintage el-nikkor 80 f/5.6 (chrome version) on a helicoid instead as these have an excellent UV spectral response, being the forerunner of the famous Nikon Rayfact lenses. 2014 Q1 Cost: £25
21 LED UV Photography Torch
The 21 LED UV torches currently sold on eBay (2014) under various labels (look for 21 LED UV torch) are nice and small and fit comfortably on a camera rig, even two of them. I bought two and they were ok for my initial testing but unfortunately I did find some variance between the two that I bought in terms of light frequency, which is advertised at 395-400 nm. The torches contain 21 LEDs which, together with a high ISO, is enough to do very small field of view fluorescence photography but on the flipside, these torches do not have the deep violet colour that the better two have, they have a definite blue rather than violet. This does not excite fluorescence as well. Uses AAA batteries, including rechargeable. 2012 Q4 Cost: £5
UV excited fluorescence
- antifreeze
- children's toys
- chlorophyll
- coral
- currency notes
- flowers
- fungi
- glofish
- harvestmen
- highlighter ink
- jellyfish
- lichen
- millipedes
- minerals
- pitcher plants
- scorpions
- shrimps
- snails
- spotted banana skin
- stamps
- tonic water
- tooth whitener
- unagi eels
- vintage lenses
- vitamins
41 LED UV Photography Torch
There is also a 41 LED UV torch currently on eBay (2014) advertised at 380nm under various names. Unfortunately it was a bit of a disappointment as the switch between 41 and 21 LEDs does not work properly. It seems to work ok though once it finds its 41 LEDs and takes 4 rechargeable AAA batteries. For these smaller torches I have to change ISO to 6400 or more and that doesn't give great results. To the naked eye this gives off a marginally more magenta result compared with the 76 LED torch - reds and oranges tend to be slightly off. 2012 Q4 Cost: £10
The UV Laser Pointer
The first UV source I tried, this pointer emits a tiny beam of blue UV. Over the very small area that the laser hits it works very well and is very bright, but this area is very small (a few mm across) so this is only useful for extreme macro at best in which the field of view is very small. Apparently it is possible to diffuse and de-cohere a laser beam by shining it through a colloidal suspension such as milk. 2012 Q4 Cost: £15
The UV Bank Note Money Checker
I bought this blacklight tube to stick on the end of a diffuser originally, under the great theory that it might want to make insects sit still when approaching them during the day. It didn't, and I've since experimented with it for UV fluorescence, but the light output is just too weak to be a useful photography tool. This is because the light is not focused but is spread out over a 6 inch long tube. The glass of the bulb is marked BLB-T5 and actually looks and acts very much like a Woods glass, being darkened and very dim. This is a "254nm" UV lamp that is sold under all sorts of names and descriptions on eBay but usually looks the same: a rectangular object with a darkened tube and on/off switch taking 4xaa batteries - "UV Bank Note Money Checker". 2012 Q4 Cost: £5 but I note it is now being sold as an "Enhanced Mineral Specimen Lamp" in the US for £30. There you go, opportunistic capitalism in action.
UV Photography Flash
one way to obtain a full spectrum flash which does emit UV is to go vintage and convert oneNikon once made a UV flash - SB-140 UV-IR - dedicated to UV photography but these are no longer made and cost the earth if bought used.
One way to obtain such a full spectrum flash which does emit UV is to go vintage and convert one. A Vivitar 285-HV, 285 or 283 are good choices for such a conversion because the xenon tube's UV emission is blocked by a plastic fresnel (rather than a thin gold coating on the actual flash tube) that can be removed with a bit of DIY re-engineering. Then that can be replaced with thin CD holder perspex (which transmits about 80+% UVA, depending on thickness), but you will also want to source a UV-only pass filter (ie like woods glass) over the flash. Note: beware on the Vivitar 285, there are various versions and an older version may not have a safe voltage for your digital camera. An alternative to a Woods glass filter would be a Baader-U filter.
An alternative way to achieve a similar effect is allegedly to use a regular flash with a deep blue/purple gel over the flash and a yellow barrier filter over the sensor. This is visible fluorescence: similar to but not the same as UV excited fluorescence. I have seen Lee 721 Berry Blue and Lee 071 Tokyo Blue recommended for this but have no personal experience of these. But, be aware that nowadays consumer flashes don't emit much UV because of coatings on the flash light. However, even this is interesting because whilst a blue-filtered flash like this may not excite UV fluorescence it may show visible fluorescence. For example creatures in the sea that fluoresce actually fluoresce more when stimulated by a blue visible light with a yellow barrier fliter than with UV fluorescence.
Narrowband UVB is also obtainable via specialised products that provide a treatment for skin conditions such as psoriasis, vitiligo and eczema. These typically cost £100 and upwards, but I have not come across any yet that are battery powered, portable and look like they have enough oomph for photography. But bear in mind that ordinary glass absorbs 95% of UVB (ie the glass in your lens), so for photography you need a special UV lens (ie quartz, calcium fluoride). It is, however, possible to purchase 254nm Germicidal UVC DC kits on eBay for £5 or so and they might be interesting to experiment with. But make sure you protect your eyes.
Barrier Filters
Professional fluorescence imaging systems contain a light source for excitation and a filter block to separate the excitation light from fluorescence, thus showing only the fluorescence. But, removing excitation can also remove all non-fluorescing colour, and well I personally happen to like a little colour as a reference in the image. So the barrier filter on the camera that I personally use for UVIFL is a yellow filter. This blocks most of the excessive visible blue and violet light from the torch into the image, but also ensures that the camera still sees some, plus any fluorescence light. I use two different filters: a "Kood Yellow designed for B&W", and a "Tiffen Yellow 12" filter. The Tiffen filter is a stronger deeper yellow than the Kood and eats about a stop more light; the Kood is more of a lemon yellow filter. The Kood yellow works better for me as a compromise between the amount of light it eats and the visible fluorescence. Cost: £10 (Kood), £5 (Tiffen).
At its core filtration - either as a barrier filter over your lens or in addition using a UV pass filter over your torch - is a way to make sure that your UVIFL image really is UVIFL, rather than an image of something lit by a source that has blue/violet light as part of its spectrum, which is colouring said object blue. A good way to test that a light source is pure UV and not UV + visible is a shiny metal test. Metal does not fluoresce, so if you take a UVIFL photo of say a metal spoon and it is blue, then you know your light source has lit the spoon with blue light, and you know your light source leaks visible light. If you cannot see the spoon then there is no visible light - ie you have a pure UV light source that's not spilling anything in the visible range that can colour your photo. The choice of barrier filter/excitation frequency combination is in fact a variable in itself, because variations in the excitation and emission filter spectral profiles do affect signal levels and image contrast of the final image.
For example my MTE and CU6 excite at slightly different frequencies, and consequently will show the same object slightly differently depending on what fluorescence they excite in said object. For the strictest of strict UVIFL you actually need something over your light source such as a Baader U filter, preventing all visible light coming out of your light source in the first place. Baader U is a phenomenally high quality UV pass filter and does a perfect job; I use one on my MTE to output even purer UV light than the torch in its sold state. Trial and error, shiny metal UV light source testing and a good choice of filters and excitation sources will obtain the best results. But the thing to bear in mind though is that at the end of the day there really isn't any single "wrong" solution - UVIFL is somewhat contrived anyway, as in a 365nm-370nm UVIFL image will show something different to a 375nm-380nm UVIFL image. Different things fluoresce and show at different light frequencies - including visible - and how you choose to show an image of this depends on you.
UVIFL Barrier Filters Compared
This was a test I did of several barrier filters, and it shows how the camera sensor can sometimes see things that our human eyes don't, especially in the IR spectrum. In all imagers I'm illuminating the subject using a 3W Nichia chip torch (MTE UV 301), which is itself filtered with a Baader Venus filter over the torch. MTE UV 301 emits 365-450 or so, but Baader Venus blocks 390+ - so in other words the only light that reaches the subject is 365nm-390nm, ie all true UV. The purpose behind this is to stop visible blue and violet light lighting the subject which will make it look all blue (blue "spill").
Sometimes the emissions in the non-visible part of the spectrum outweigh those in the visible part of the spectrum, especially infra-red, and a dslr camera can see those (although we can't with our eyes). The red/magenta colour is infra red transmission.
Same subject as above, this time tested with a UVIR Baader filter over the lens, blocking UV and IR.
Test with a Wratten 2b (similar to Baader, vintage filter from eBay).
Test with a consumer skylight anti haze UV filter Hoya(0).
UV Camera Settings
These LED torches for UV photography produce almost exclusively blue and purple light and on-camera adjustment is necessary to achieve a non-purple image. The combination of using a barrier filter, a low colour temperature and colour settings slanted towards red on the colour wheel do this for me but this is an area of considerable ongoing experimentation.
On another note, I have to say that it is a loss that Pentax K-5 and Pentax K-7 DSLRs only let you use the inbuilt yellow colour filter with black and white images otherwise that could be neat as a yellow barrier filter.
Full Spectrum Flash
I have tried a couple of experiments to make a full spectrum flash, one of which succeeded and one of which failed. Much to my surprise the vintage Paffrath Kemper PK UR130Z emits minimal UV, so using this isn't a project worth pursuing. Quite sensible though I suppose on the part of Paffrath Kemper, after all these things shoot directly at people's eyes. However, the Cactus KF36 that I took apart to remove the plastic UV-blocking fresnel does emit UV. A Cactus KF36 is the same flash made in the same factory as a Vivitar 285HV but under a different label. The somewhat cult workhorse of the 80s Vivitar 285HV is well known to make a reasonable full spectrum flash when converted, but it is also much in demand - the Cactus happens to sell on the used market for much less. The Cactus unfortunately gave me a disappointing light output, using it at 1/1, and this is a line of experimentation that merits further investigation in the future with other flashes.(2014 Q4 Cost: £5)
Nichia UV LEDs
In 2012/2013 there were 3 varieties available. Nichia NCSU033A has 250mw output and has been available for a long time. Nichia NCSU033B is relatively new, gives 325mw and is the type available in decent specialist UV torches, like in the MTE UV 301 torch above. Nichia NC4U133 is the most powerful, and has 950mw output. Although there are conflicting reports, my impression is that Nichia do not push NC4U133 as a single purchase consumer product; prices are typically around $200/unit for bulk purchases of 10+.
In 2015 Nichia released a new generation of UV LEDs which included a high powered NVSU333A. Nichia NVSU333A is the most powerful of the range, a 365nm 3540mw LED, a LED more than 10x more powerful than the previous consumer LED workhorse NCSU033B rated at 325mw. I will be testing a torch that uses NVSU333A, and hope to post an update with the result in due course. Nichia also released NVSU233A which is a 365nm 1030mw unit, this can also be expected as a consumer product in 2015. Progress has been fast in UV LED technology in 2014-2015, progress which is expected to continue.
The progress in UV LED technology is encouraging for photography as one of the challenges is a very weak light signal and consequent need to use painfully high ISO values for handheld shots. This situation should improve with advances such as the Nichia NVSU333A and the possibility of handheld UV fluorescence photography rather than long exposure tripod mounted UV fluorescence photography is definitely coming closer.
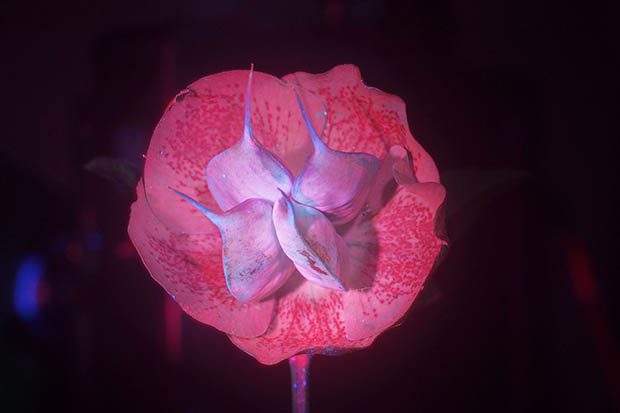
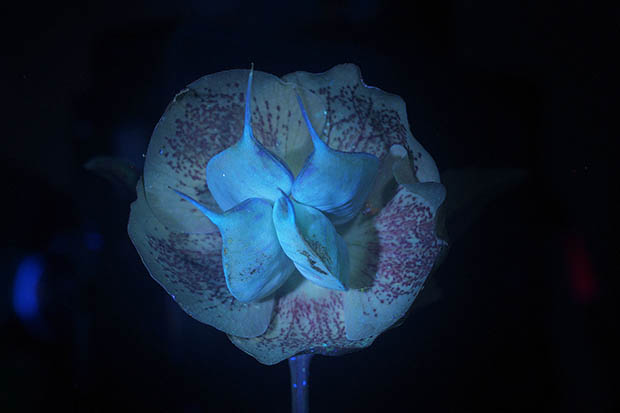
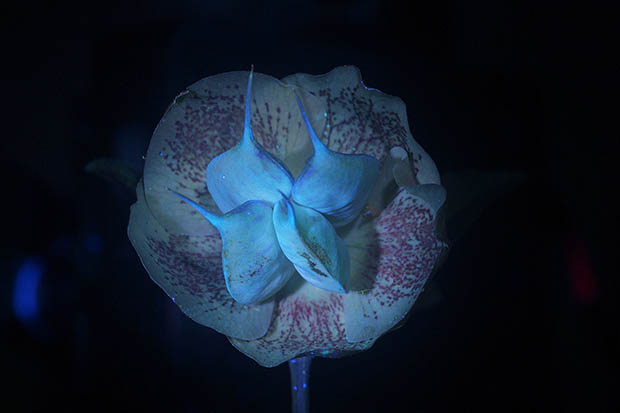
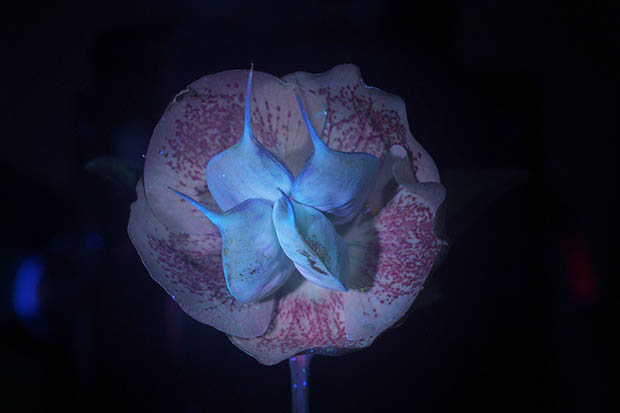
UV Excitation & Colour Changes In Plants
Something that I am discovering is that plants and flowers exhibit a wide variety of colours when excited by UV, even within the same plant. UV fluorescence is in itself actually a signature for leaf aging and health, with distinct differences visible within the same plant - for example if a plant has some leaves directly facing the sun but others sheltered in deep shade they are often different colours. The explanation: plants emit red (RF) and far-red (FRF) fluorescence because of chlorophyll excitation (Chl), and blue-green fluorescence (BGF) because of hydroxycinnamic acids. As plants are hit with sunlight, RF and FRF decreases with leaf and tissue ageing because of an accumulation of UV-absorbers in the epidermis. BGF, which emanates from the leaf surface, does not change in fluorophore composition during leaf ageing. This is actually an area of ongoing research in agriculture, as UV excitation can demonstrate plant health as well - for example the ratio between the red Chl fluorescence and the blue/green fluorescence is a diagnostic tool for site specific differences in nitrogen availability.
UV Safety
Looking directly at UV really isn't terribly clever. There are plenty of UV goggles and glasses available for the price of a couple of beers, and you'd be an idiot not to buy these if working with UV light sources. Also, exposure to skin etc isn't the greatest idea, so please read up on UV safety precautions before using UV light sources.
Related Articles