Focus Stacking
by Johan J Ingles-Le Nobel
Last updated July 17, 2018

Focus stacking is a photography term used to describe the process of combining photographs to obtain images with a much larger depth of field that would be possible in a single photo.
Focus stacking as a photography technique is especially useful for macro photography of small objects, because regardless of the f/stop used, the unavoidably small depth of field shooting small objects means that much of your subject will actually be unsharp and out of focus. Stacking overcomes this by combining the sharpest parts of several images focused at different points and combining them into one very sharp composite image.
Starting out with focus stacking isn't hard, can be done at any time and doesn't need to be expensive. All you need to start focus stacking is a digital camera, a stage, a flash, your tripod, the right software for stacking and a good sprinkling of patience.
Focus Stacking Walkthrough
1 ➤ The focus stacking workflow
2 ➤ How to prepare a focus stack
3 ➤ How to shoot a focus stack
4 ➤ Software tools for focus stacks
5 ➤ Postprocessing tools for focus stacking
Focus stacking is done by amateurs, professionals and part-timers, has applications in entomology, science and astronomy and there's even a camera that focus stacks on the Mars Rover. Focus stacking, also known as macro stacking, focal plane merging, z-stacking and focus blending, can be done inside on the kitchen table during winter and is fun to learn, opening new worlds and opportunities for photography. Like anything, there's a workflow and certain amount of preparation that's done before shooting a focus stack.
Learn Focus Stacking!
As of March 2017 I'm now doing full and half day workshops covering everything macro, which of course includes focus stacking! If you want to try out Stackshot, WeMacro or MJKZZ stages, or want to learn Zerene and/or Helicon Focus, and spend some time getting to grips with the whole stacking process from a to z, you could do a lot worse than to spend a day doing macro, learning insect praparation techniques and learning to stack.
Focus Stacking Tips
Regardless of the software or hardware you're using to create a focus stack, there are certain standout factors that will affect the quality of your final focus stack. One thing to observe is that for many not so great stacks, all the factors need to be explored and relying just on buying a more expensive lens is no guarantee of success if all the other factors are not in good shape.
Sharpness - Focus stacking is not a magic bullet that converts 10 unsharp images into one sharp image. For a successful stack, you need sharp images to begin with. So combining shots made with flash freezing the images sharply are more likely to be successful than shots which use handheld long exposures creating pixel blurry shots. Obviously handheld exposures are perfectly capable of creating sharp images if there is enough light, but do be aware that doing everything you can to maximise initial sharpness can influence the quality of the final focus stack greatly. That said, stacked images can be surprisingly unsharp and some moderate high pass sharpening is usually required.
Lens - The less abberation and distortion your lens has, the better the chance you give to your stacking software to align the images correctly. But what is of particular importance to focus stackers is not only the absolute quality and resolution of the lens for the single image to be stacked, but also its properties and how it performs throughout the stack, which manifest itself as perspective and magnification changes between frames as the camera focuses at different focus points to create a stack sequence. Topend stackers look for lenses that minimise such changes in perspective between frames, as a complete undistorted field of view over the target without any perspective or magnification changes between frames will make it easier for stacking software to render a good stack. On DSLRs and full frame cameras, reversed enlarger lenses and microscope objectives make for a good value for money lens to stack with.
Focus Stacking Software
There are two main commercial vendors of focus stacking software: Zerene Stacker and Helicon Focus. Both give superb results in the right hands, although in my opinion, the focus stacking software of choice does tend to be Zerene Stacker for photographers interested in quality rather than speed. Zerene has the edge because of third party advanced retouching (slabbing) utilities available, seems to construct marginally superior 'out of the box' stacks and handles alignment more thoroughly. Plenty of other software can also be used for stacking but I've found the results to be in a class below Zerene and Helicon; you certainly won't find many (or even any) stack user-set variables such as depth maps etc on non-specialised software.
Subject - Some subjects simply stack better than others because of the complexity that you are asking the stack to merge into one. Objects with many thin low contrast overlapping elements such as hairs or branches are high complexity subjects that are often tricky to stack on a first pass and benefit from extra focus stack retouching or substack slabbing, whereas smoother, planar objects such as small pebbles, shells and electronics components do tend to be easier to stack successfully.
Focus Stacking Hardware
A special mention should be given at this point to the various electronic focus stack rails, as this is probably the single most expensive accessory that people have their eye on when diving into stacking. There are increasingly more companies producing these, and there is a useful comparison of electronic focus stacking rails on my blog. Cognisys Stackshot is the class leader, with most functionality, and WeMacro is the other end of the spectrum - few options but phenomenal value for money. There are others: macrorail in Spain, Stackmaster in Germany and last but not least, the various MJKZZ stages and its very interesting THK KR2001 Conversion Kit.
Overlap - Focus stacking is all about overlapping shots with sharp sections to create an all-in-one sharp image. Whilst there maybe a temptation to maximise the band of sharpness on each shot to be stacked by using a small aperture such as f/64, do be aware that diffraction softening can and does occur. I tend to use a lens at the lens' best performing f/stop and adjust increments to suit that, rather than adjusting increments to minimise exposures needed.
Free Focus Stacking Stuff
Free focus stacking software is also available: ImageJ is used by many science institutions, Hugin tools (with enfuse) is also used and there is also Picolay. There is also the older CombineZP and variants.
Light - There is no law saying that you have to use diffused lighting for focus stacking but in my experience diffused lighting that comes from a variety of angles will give your stack a bigger chance of succeeding as intended. To simplify matters - if you can keep the dynamic range of your shot down a bit rather than playing right at the peripheries with harsh, contrasty lighting, you'll give your stacking software a better chance to find common information out of each frame to construct a decent stack.
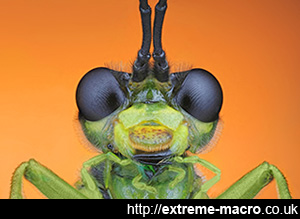
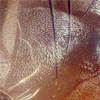
Focus stack studio shot of a sawfly using the Componon 35 f/4 and a cognisys stackshot stacker. This is a stack of 213 photos, finished off with CS4, NoiseNinja & Topaz Detail.
Focus Stack Workflow
Good focus stack preparation prevents a lot of work in post. Before starting your studio speciment stack, clean, spread, card and pin the subject and have it ready to be moved into position.
Switch on any equipment that needs to be on for a while before settling at the correct colour temperature. Read more.
Shooting The Focus Stack
Use the focus stack step calculator below to set a safe step size, and make sure that your batteries are fresh. Set up your lighting and diffusion, work the stage to the ends and as a very last step, actually mount the specimen that you actually wish to photograph. Read more.
Processing Your Focus Stack
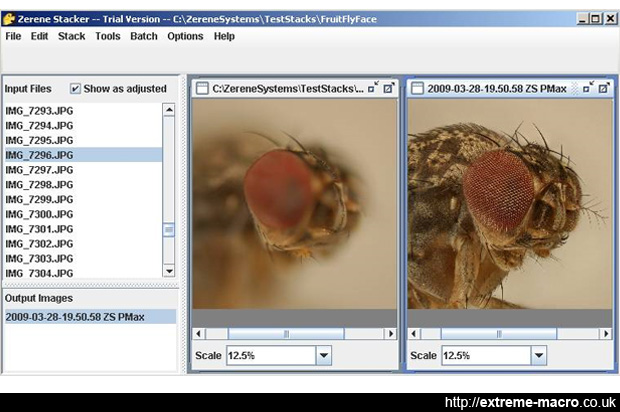
Zerene Stacker software, the discerning software choice for extreme macro focus stacking. Zerene Stacker is available as a free trial and can be downloaded here.
Process and stack your images using your stacking software, bring in the substacks and perform any necessary retouching.
Focus Stack Post Processing
Adjust levels if necessary, enhance detail, remove noise, remove dirt by cloning, carefully sharpen and fix for presentation. Focus stacks are rarely supremely sharp or beautiful before postprocessing work is done and this stage is usually an important part of the overall macro focus stack process.
Focus Stacking on a Budget
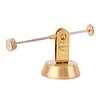
For a low-cost focus stacking setup that gets you up to 5:1 or so, you really don't need expensive equipment. It is better to start with flash rather than continuous lighting because you'll avoid the unsharpness that long exposures and continuous lighting can give you. Flash freezes the subject. If you already have a camera, all you need to diffuse the on-board flash is a sheet of tissue paper which makes a fine diffusion material. To move the camera use a Velbon Super Mag Slider and make your own dial for greater sensitivity. As a specimen holder, either use a helping hand or an old lens (which can be twisted to make an up/down platform), blu tack and a pin. Then stack using ImageJ, which is free!
Allow Time for Stacking
Allow plenty of time for stacking. Focus stacking is not a speedy process, and most stacks tend to take several hours from start to finish. There are two especially time-consuming stages: shooting the stack itself (ie 100 images at 1 every minute) and rendering the stack in the stacking software. Regardless of your stacking software, making a stack is a very slow, memory-intensive task, and your computer will more than likely have most of its process memory consumed by your stacking software when running, so there is not much scope to run other memory intensive applications such as Photoshop at the same time. It will help to switch the optional preview of the stack as it is being made off, and also to limit the amount of perspective and rotation correction you make your stacking software do. My preferred workflow is to take the pictures for an actual stack in the evening, and then make the stacking software do its thing overnight whilst I'm sleeping.
Focus Stacking Method
There are two methods that can be used to focus stack: vary the plane of focus by moving camera (or subject) backwards and forwards, or vary the plane of focus by refocusing a lens at different focus planes. The latter is no good for lenses without electronic focus, and cannot be used by all brands or cameras; it is limited to the brands and lenses that Helicon Focus can adjust the focus for; this excludes for example mpe65, reversed enlarger lenses, JML21 and microscope objectives. The former method, moving either the camera or object, also has the added benefit that it can do much more magnification, down to 10:1 on its own or 50:1 on a geared-down microscope focus block.
Common Focus Stacking Problems
Your first stacks will be your worst. They may very well exhibit one of these very common stacking problems, which we have all had at some point. There is nothing to be alarmed about if you get these and it is always best to concentrate on getting your equipment train and workflow in good order first before expecting excellent results. Stacking is a slow process and learning to avoid issues is just a small part of this.
Focus Breathing
Focus breathing aka is the change in perspective as you focus on different parts of a subject, from (relatively) distand to (relatively) close by. It means you'll probably end up with less defined detail at the edges of the frame, but if you're using software with scale and perspective correction (ie Zerene) it shouldn't be a problem.
Unsharp
 Unsharp stacks are commonly caused by vibration during the stack when using long exposures and continuous lighting, but can also be due to a poor optic, high ISO or use of too high a f/stop. Solution: Use flash instead, low ISO, try another optic and add some gentle post processing sharpening. High f/stop use may cause diffraction softening.
Dark Lines (aka stackingworms)
 Dark lines are caused by dirt on the sensor, compounded into a line because of the stacking process. Solution: test for sensor dust by shooting a high f/stop frame, then use a good sensor cleaner to remove. Photoshop cloning or Zerene retouching from one frame can rescue these in case of emergency.
Light Lines (aka stackingworms)
 Not uncommon, this is a "dead" or "hot" pixel, compounded into a line because of the stacking process. They often appear with long exposures (several seconds), and do increase with increasing sensor temperature. Usually they're too small to notice because they're just a single pixel. Solution: There maybe a pixel remapping mode on your camera. If not, just retouch from a single frame.
Credit to the fine fellows at the German language stacking forum www.focusstackingforum.de, both coloured and black lines now have an appropriate name: STACKINGWORMS
Splodge
 Your stacking software constructs a weird out-of-focus colour splodge and halo. Caused by the stacking software getting confused by out of focus colour values and adding them into the in-focus composite. Helicon Focus is more prone to this than Zerene Stacker. If using photoshop, caused by photoshop selecting big blocky areas instead of tracking closely to the actual structure of the subject. Solution: in Zerene Stacker, experiment with different dmap settings - change threshold values or use Pmax. Helicon Focus also allows parameter adjustment but the effects are not as improvative as Zerene.
Transparent Hairs
 Semi transparent hairs are a common artifact that happen when you use a wide aperture lens that can look round foreground objects to see a focused background. If there is higher contrast detail in the background than in the foreground, then the stacking algorithm will show the background through the foreground. Solution: Break the focus stack up into smaller parts and use substack slabbing.
Focus Banding
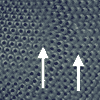 Bands of sharp and unsharp areas over the image, a common issue when starting out focus stacking for the first time. This is because your stacking steps are too big so you are not just stacking sharp areas. Solution: Use more steps to cover the same object in your stack (ie smaller distances between each step).
Related Articles