The M42 Iris
by Johan J Ingles-Le Nobel
Last updated August 31, 2017

One of the problems that we face in making extreme macro stacked photographs is the fact that we use lenses at their sharpest setting all the way through the stack, which means a problem, because the background will always be very far out of focus. An M42 Iris is the solution to this problem.
By having a separate iris that we can control the aperture on, it means that we can use this to make a stopped down shot, which gives us a last (or first) shot with a greater depth of field.
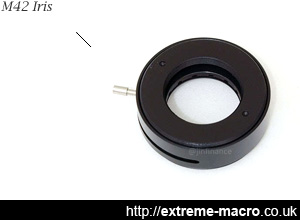
M42 Iris from 'source all things weird in the world of extreme macro' eBay seller JinFinance.
An M42 iris is a manually operated device that allows for smooth transitions to out of focus areas. A bit of care needs to be taken in its use.
In my version there are no markings on the iris so you should measure the radius at different settings to add your own markings.
The Wall of OOF
The thing about stacking shots is that each individual stacked shot is excruciatingly sharp. And this is intentional, because in extreme macro stacking there's no need to use a lens at an aperture designed for depth of field or even to concern yourself with that aspect of the lens. After all we're going to stack the images so why sacrifice best sharpness performance for a depth of field performance that we're going to achieve by other means: stacking.
But this glass-piercing sharpness is over the tiniest depth of field only. This isn't a problem over the length of the stack as we're combining the images so we'll achieve depth of field this other way... but it is a problem once you reach the end of a stack run. Because if you want a nice smooth transition between in focus and out of focus (oof), then you'll need to have a few shots added into the stack at the end which aren't taken at the objective equivalent of f/1, but taken at a more portly f/8 or f/16 just to prevent that wall of oof (out of focus) and make the transition a bit nicer.
Using an M42 Iris
The M42 iris that I have is a staggeringly simple device. It's more or less the equivalent of just a double thickness M42 filter with a manually adjustable iris in the middle. I fit this between the infinite microscope objective and the tube lens, and it works a dream. My working procedure is basically run a complete stack with a few spare frames before and after my stack length, then adjust the iris and take a few more at a different ISO to give me a selection of nicer OOF shots to add at the end. Couldn't be simpler really. And that's about all there is to it.
It's actually not strictly necessary to have an M42 sized iris at all and you can go with whatever suits your particular configuration (ie lens diameter of your infinite tube). I don't think there's a great deal of difference between irises other than a possible differentiation based on a highlight shape based on the aperture blade shape if you're actually showing those, but they don't get seen too much on extreme macro unlike regular images.
Being an M42 device, it is necessary to purchase the correct adaptor to fit this into an extreme macro setup, and there are several companies that sell M42 adaptors. One thing to keep an eye on is the pitch of the adapter as there are two 42mm threads commonly in use: one for telescopy (T mount) which has .75mm pitch and another for photography (M42 mount) which has 1mm pitch.
Carefully Does It
The M42 iris is a manually operated device and care needs to be taken in its use. There are no markings on the iris so you should measure the radius at different settings to add your own markings. This will enable you to repeat settings accurately over different stacks. It is worth spending some solid testing time over these settings because obviously as you stop down your iris you will need to change your lighting, ISO or shutter speed to compensate for a smaller f/stop.
The thing to really test for is to work out how to use this iris manually without disturbing the camera. Although Zerene Stacker will cope with alignment changes, it is better to avoid these in the first place. Avoiding them using an iris by being careful is perfectly doable, but the trickier part is adjusting a camera to compensate. I tend to adjust the lights rather than adjust the camera but will take a few 'just in case' shots as well with camera adjustments.
M42 Iris Position
An iris in extreme macro does not need to be placed between lens elements but can be placed at the rear of a lens group. The result is not quite as smooth as an aperture placed in the centre but, depending on how far it is from the lens group, the result is still acceptable. An iris will increase diffraction and may introduce chromatic and other aberrations but the effect that I have seen is minimal and it is well worth adding one of these for the difference it makes to your background.
Related Articles