Noise Ninja
by Johan J Ingles-Le Nobel
Last updated August 31, 2017

Noise Ninja is a great little noise tool, which works extremely well to remove the noise from images, especially in the darks on stack backgrounds where I've always found it to be a particular problem.
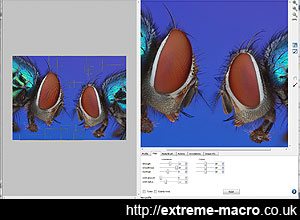
Noise Ninja, a superb way to remove digital noise in the dark areas of your image.
What's nice about Noise Ninja is that it also does selective noise cleanup using a brush-like mechanism, so you're able to get a lot of control over the area that you want to reduce noise on.
Noise
Noise is one of those digital facts of life that's somewhat unavoidable in dark areas. Though most cameras are almost noise free at low ISO, underexposed darks are usually still noisy so it's worth running it through Noise Ninja just be certain of removing any trace of noise. While not noticeable in small to moderate sized prints, if you're making big enlargements it really can produce a cleaner file and better prints. In fact there's almost no file that it cannot improve in some small way.
Using Noise Ninja
almost no file that it cannot improve in some small wayThe process of using Noise Ninja is quite simple. You can either use one of the predefined settings or you can use the dropper to examine a noisy area and create a custom profile. Add more areas with the dropper and you're able to build up a very detailed profile for your particular image.
Whilst the conventional use of Noise Ninja tends to be to have a series of profiles based on the ISO you're using (ie one for each), I personally find it more useful to use the profiles as a way of storing information about certain colour values (ie certain darks), and that then starts building up a series of profiles for you to use on other pictures. The way I work noise ninja is by grabbing a lot of the background areas only and building the profile based on those.
Add more areas with the dropper and you're able to build up a very detailed profile for your particular imageNoise Ninja works as a plugin on photoshop, so you can call it up as one of the last steps whilst doing post processing on your image. I personally prefer to go a little easier on the smoothing control as it can create overly plastic looking images if overused.
Noise Ninja Workflow
I don't know if this is the best workflow but it seems to work for me. Typically I take images on a stack, then combine, then do as much post processing work as I can, before finally removing noise and as the very last step, sharpening. The reason for doing it this way round is that I don't want to sharpen noise or defects, so that's last, preceded only by noise treatment. Noise treatment alters pixels so I don't like doing it before doing the post processing.
Related Articles